Tagging for customised newsletters
Set tags and win twice over: less wastage, more targeted communication.
- Targeted email marketing
Address your customers with exactly the content that really interests them. - Personalised approach
The more tags a recipient has, the more personally you can address them. - Higher open rates
Increase the performance of your newsletter with personalised content.


Newsletter Marketing Tags
What is the definition of TAG?
Translated, TAG means label. But what is it in email marketing? In email marketing, the term "keyword" fits better; tagging can thus be defined as keywording or labeling. When a recipient is tagged, certain terms are simply assigned to them; labels are virtually attached to them. Transferred to our newsletter tool, certain tags, i.e. catchwords, are added to recipient profiles.
How do you benefit from tagging in newsletters?
The advantages of tagging in email marketing
- The individual recipient is seen individually
- The more tags a recipient has, the more personally he or she can be addressed
- There is less wastage due to the targeted approach
- With the help of the tags, the list of recipients can be segmented very easily and again and again
- By using tag triggers in automations, the recipients themselves trigger automation chains.
Add tags manually or automatically?
Get started now with CleverReach!
Have you become curious? Then simply try out our Newsletter Editor online - no download required! Create an account and use the CleverReach Newsletter Editor for free!
Get to know your recipients better through tagging
This is how easy you set up the link TAGs
1. Mark link text

Our CleverReach newsletter reports show how many recipients have clicked on a link. This allows you to assess the quality of your content. If many recipients clicked on your link, you hit the mark with your newsletter content. But for which recipient exactly was the content so interesting that they wanted to know more? You can find out by also setting a TAG for the link. This will attach the appropriate tag to each clicking user.
Assigning tags is quite simple:
- To assign a tag to a link, first highlight the text you want to link to in your newsletter.
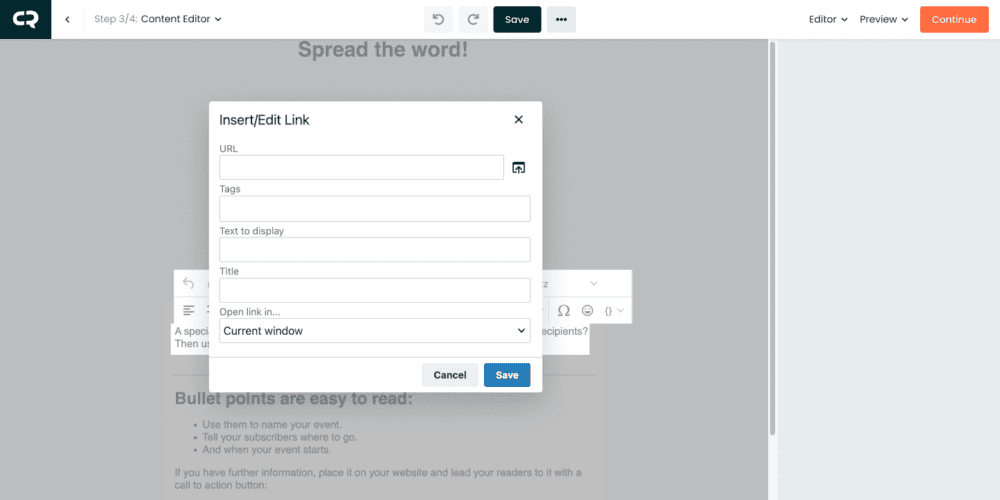
- Then click the "Insert / Edit Link" button (the chain icon) in the edit bar that appears above your text.
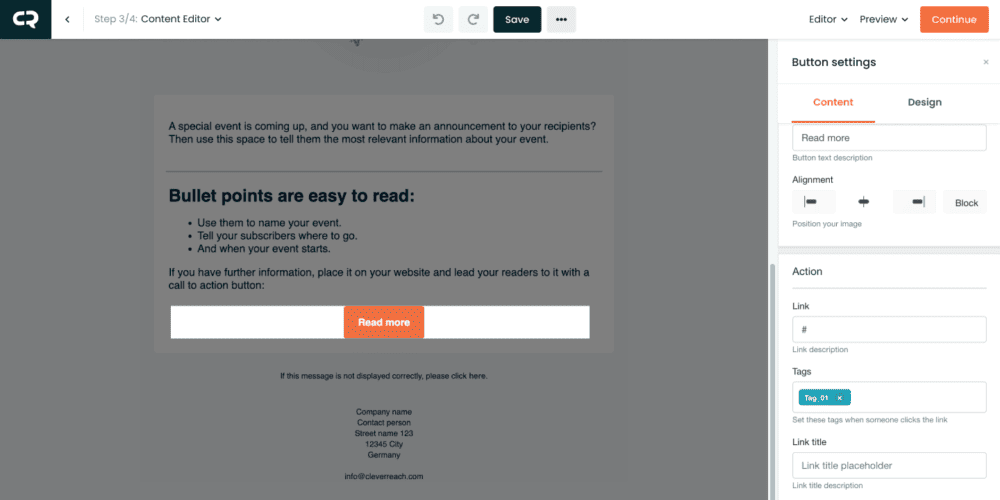
TAGs can also be specified when linking images or CTA buttons.
2. Insert link and TAG

- An input window will then open.
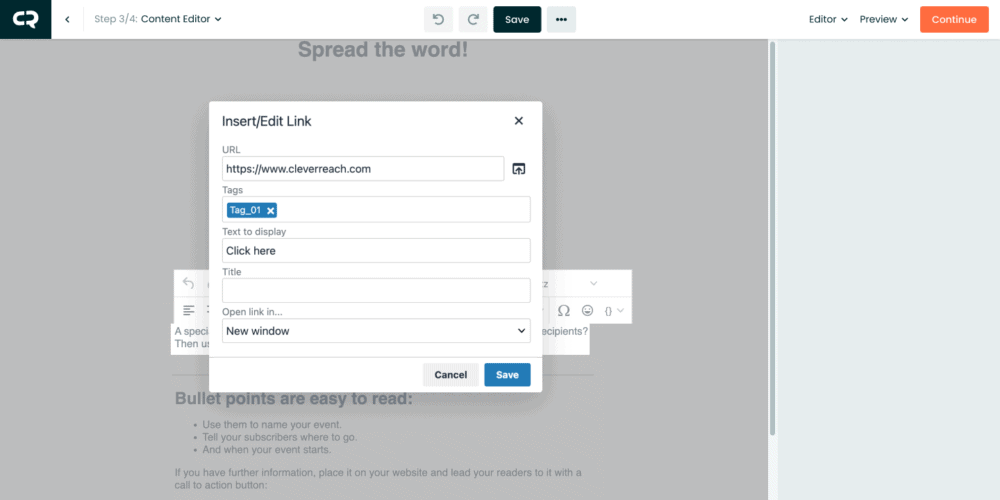
- Here you enter the URL for your link target in the top field.
- In the "Tags" text field, enter the TAG that the recipient should receive when they click on the link.
You're done! You can also use the same principle to add TAGs on your images and your CTA buttons.
3. Select or enter TAGs

- In the TAG field, enter the term with which the recipient is to be tagged.
- If the TAG is already in use, it will be displayed and you only need to select it.
- After entering or selecting, press the [Enter] key on the keyboard or click "Ok".
- The TAG is assigned to the link and now appears blue
- Several TAGs can be stored for the same link.
What is the purpose of storing multiple TAGs for one link? An example: Your subscriber clicks on a link. It leads to a special offer of sneakers of a certain brand. He now receives the TAGs special offer, sneaker and the brand name.
4. Manually tag recipients

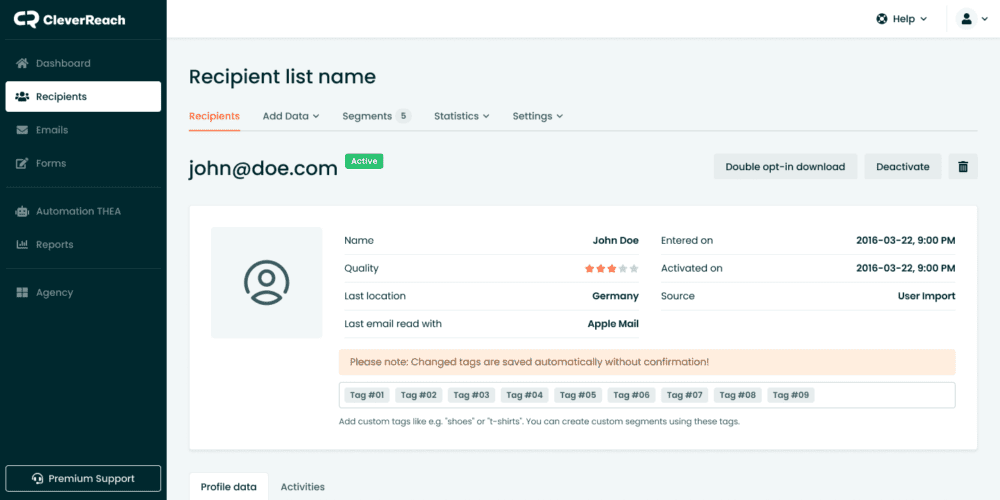
It is also possible to manually assign TAGs to its recipients. To do this, go to the corresponding recipient record and there to "Edit".
Then click in the gray area. As soon as you enter a space, a list of already assigned TAGs will open automatically. Either select a TAG there or simply enter the TAG you want, press Enter and the TAG is stapled to the recipient. The number of TAGs you can pin to your recipients is not limited.
5. Dynamize your recipient list with tagging

Thanks to tagging, you can not only segment your recipients very easily, you can also regroup them again and again - from newsletter to newsletter. This way, your subscribers always receive relevant information - and you show appreciation by sending them only the things that are really exciting for them.
And it keeps getting better: since there are new links in every newsletter, new clicks and thus TAGs are generated with every campaign. This increases the accuracy with which you can select your recipients for the next newsletter. The more emails you send, the deeper and more differentiated you can select your recipients.
TIP: In combination with automation, not only the content is controlled via TAGs, but also the time of dispatch. This way, each recipient not only receives content tailored to them, they also receive it at the appropriate time.
Start now with CleverReach

Ready to get started? Just pick the one that works best for you from our range of price plans. Customizable at any time and no hidden costs.
- no setup fee
- multi-lingual service team
- detailed guides, helpful video tutorials, and inspiring blog posts


